Download From your wpshopmart account panel

Uploading Construction Zone Pro via FTP to WordPress

  • Download the zipped theme pack to your local computer from member dashboard and extract the ZIP file contents to a folder on your local computer.
  • In the extracted folder you will find 'construction-zone-pro.zip' Extract this file .
  • Using an FTP client to access your host web server.
  • Upload the Theme files in the extracted folder called 'construction-zone-pro' to (/wp-content/themes/) directory provided by WordPress.
  • Visit WordPress Dashboard > Appearance > Themes, then click the Activate on construction-zone Pro theme.

Installing Construction Zone From the WordPress Dashboard

  • Download the zipped theme pack to your local computer from member dashboard and extract the ZIP file contents to a folder on your local computer.
  • Log into your WordPress admin panel and click on the “Appearance” tab.
  • Now click on the "Add New" tab.
  • Click on the "Upload Theme" button, "Browse" for file called construction-zone-pro.zip in the extracted folder select "Open".
  • Click the "Install Now" button.
  • Activate the theme from this page, OR "Return to Themes Page" and activate from there.

This theme may be updated periodically in order to add new features and fix bugs. When a new update be avilable an update notification will send you via email . As a customer, you can download the most current version from your member account.

Updating Manually

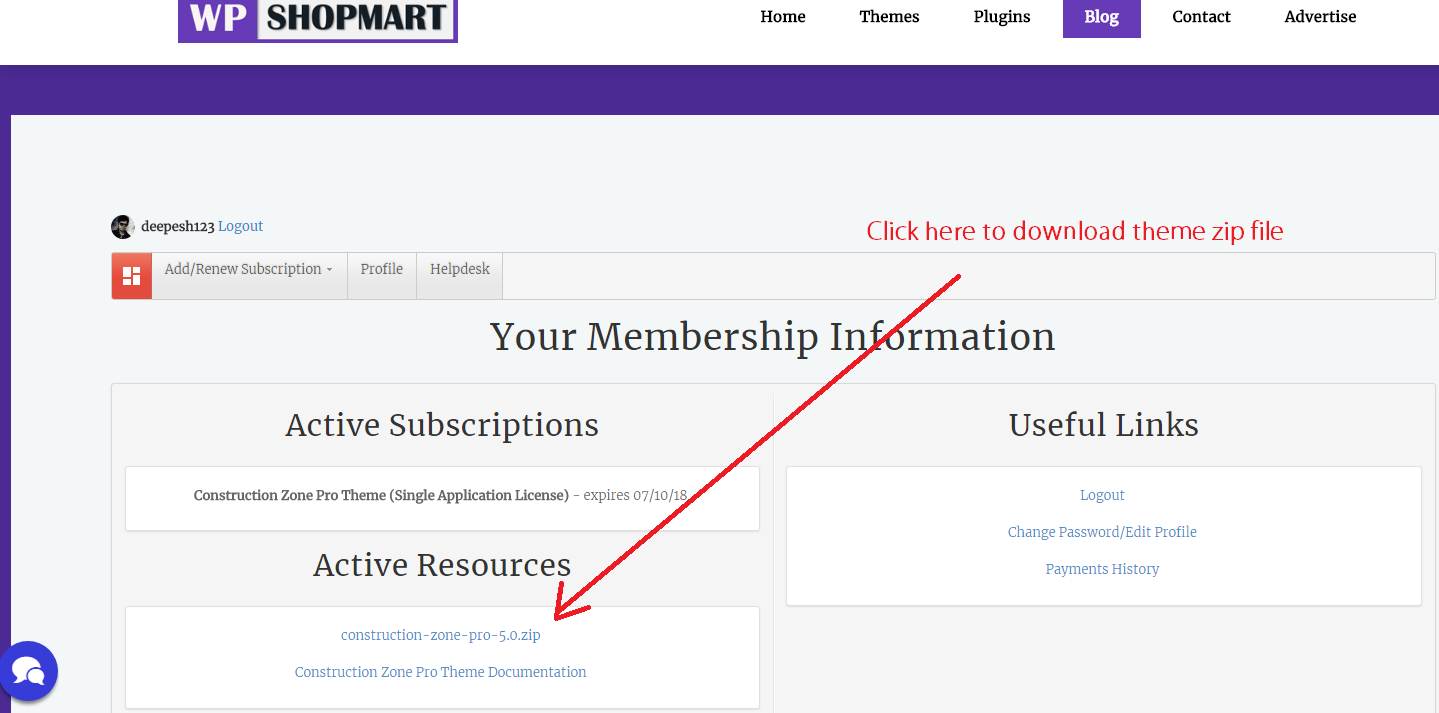
  1. Download the most current version from member dashboard in the "Downloads" area of your account.
  2. Unzip the package and locate construction-zone-pro.zip in the theme folder.
  3. Go to Appearance > Themes and activate another theme such as the default WordPress theme.
  4. Delete the Construction Zone Pro theme which is now inactive.
  5. Go to Install Themes > Upload then install and activate construction-zone-pro.zip from the new package.

This Theme uses wordpress built-in menus feature which can be found in your wordpress dashboard > appearance > menus. To setup a new menu, please follow the steps below. Its best to already have your pages created, even if they are blank pages.


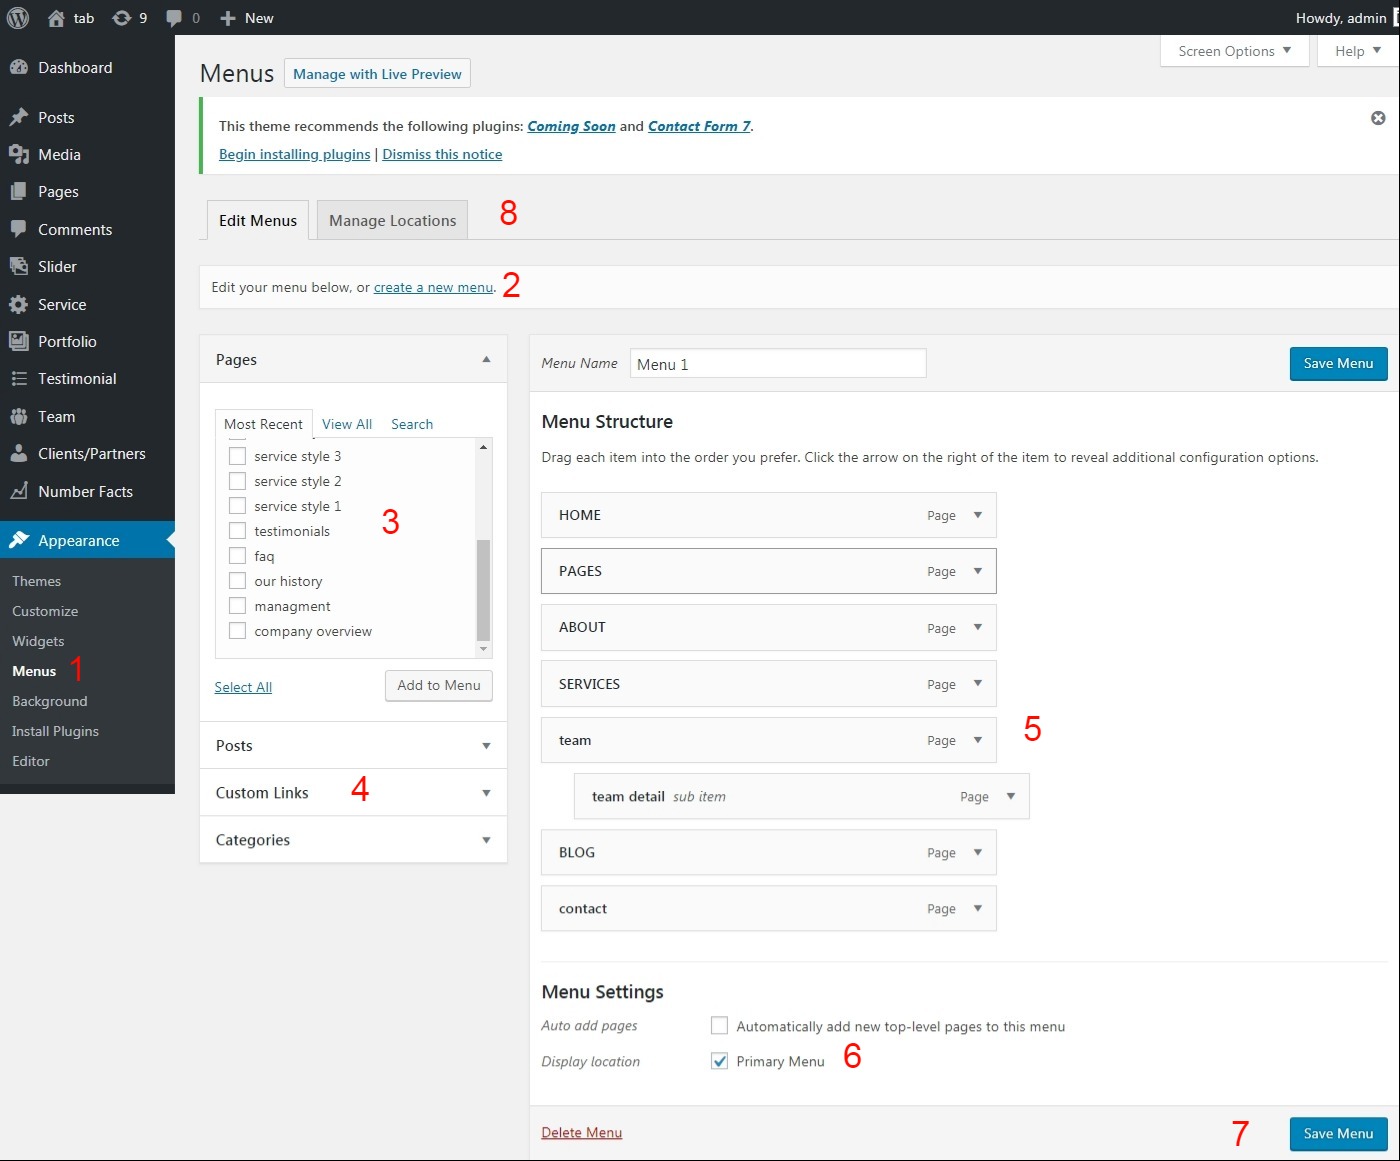
  1. Navigate to Apperance > Menus page
  2. Click the "create a new menu" link to make a new menu. Enter the name then hit Create Menu
  3. To add a menu item, you can easily select one of your already made pages on the left hand side and click Add to Menu
  4. You can also add menu items by entering a custom name and custom link into the Links box.
  5. You can manage your menus using the drag and drop functionality. To create a dropdown menu, simply drag a menu item below and slightly to the right of another menu item and it will lock into place and create a dropdown section.
  6. After setting up your menu, select the menu you just created as the Primary Navigation in the Menu Settings and Create a new menu and select it as the Top Menu Navigation in the Menu Settings
  7. Once its all done, make sure you click the Save button.
  8. You can chnage menus locations in any time from Manage Locations tab .

  1. Navigate to Construction Zone Settings page > Header Navigation tab .
  2. Click to Logo and General Styling
  3. Select Use Image for Logo Yes
  4. Upload Logo File from your computer
  5. Select logo width and height
  6. Then click on save changes
  7. If you want to use logo title instead of image then go on dashboard click on Appearance - > customize -> site identity then enter site title.

  1. Go to (WordPress Dashboard > Settings > Reading)
  2. Under " Front page displays" you will have two options:
  3. "Your latest posts" use this option in case you want to show a list of your recent posts in a blog list view
  4. "A static page" we recommmend creating a new page called "Home" in WordPress, so you can assign this page as your static front page and you will be able to customize
  5. Click Save Changes

  1. Go to (WordPress Dashboard > Pages > All Pages)
  2. Edit Your Home Page
  3. Select Template Homepage-1 or Homepage-2 from the dropdown
  4. Click Publish Button

  1. Go to Construction Zone Pro Settings
  2. Click on General Settings
  3. Upload Your Site Favicon for showing favicon with site title in browser tab
  4. Back To Top Butoon will help when webpage scrolling is in very depth. In this case user can reach top of the webpage clicking on this button.
  5. If you want to Enable Preloader when front page appear then click "on"
  6. Keep Back To Top Butoon in Mobile will help when webpage scrolling is in very depth in mobile devices. In this case user can reach top of the webpage clicking on this button.
  7. Google Analytics will help you to track users. You can insert your google analytics code
  8. Custom CSS Code will help you to apply custom css to the Theme

  1. Go to Construction Zone Pro Settings
  2. Click on boxedlayout
  3. If you want box layout of theme than select Enable Boxed Layout? "On"
  4. You can select Background Color, Background Image, Background Repeat,Background Position, Background Attachment, Auto resize background image to fit window? Properties for your box layout

  • Go to Construction Zone Settings
  • Click On Home Page Settings
  • Select Slider Option
  • You can select slider properties from this section


Add Slider Images And Description

  • After Set Slider Properties now Go on Slider
  • Click On Add New Slider
  • Select Slider Option
  • You can select slider properties from this section
  • In this section You can add mutiple slide by adding Add new slider
  • Slider content Like Text, Button URL, Image will be added from this section

Design Video Popup Section

  • Go to Construction Zone Settings
  • Click On Home Page Settings
  • Select Video Popup Option
  • You can insert Setion Title, Section Image, Youtube Video URL or Other Channel URL and Section Image from This section.
  • Then Click And Save

Design Service Section

  • Go to Construction Zone Settings
  • Click On Home Page Settings
  • Select Service Option
  • You can insert Setion Title, Service Section Description, Service Column, Select Services Group, Number Of Service on home page
  • Then Click And Save

Add Services

  • After Set Services Properties now Go on Service
  • Click On Add New Service
  • You caninsert Service Title, descritpion, icon and group from here
  • Then Update Your First Service. After it You can add more services in same style.

Design About Section

  • Go to Construction Zone Settings
  • Click On Home Page Settings
  • Select About Option
  • If you want add about section on Home page then enter About Section Title, Description and Image ito given fields
  • Then Click And Save

Design Feature Section

  • Go to Construction Zone Settings
  • Click On Home Page Settings
  • Select Feature Option
  • For Features option there is no Metabox. Simple Create features form as like as service meta box and assign a group
  • Select Assigned group within the features option
  • Then Click And Save

Design Portfolio Section

  • Go to Construction Zone Settings
  • Click On Home Page Settings
  • Select Portfolio Option
  • You can insert section title,Image, description, column, categories and filter option from this section

Add Portfolio

  • After Set Portfolio Properties now Go on Portfolio
  • Click On Add New Portfolio
  • You can insert Portfolio Title, descritpion, Client Name and categories from here
  • Then Publish Your First Portfolio. After it You can add more Portfolio in same style.

Design Testimonial Section

  • Go to Construction Zone Settings
  • Click On Home Page Settings
  • Select Testimonial Option
  • You can insert Testimonial Title, Description, Image,Column and group from here.


Add Testimonial

  • After Set Testimonial Properties now Go on Testimonial
  • Click On Add New Testimonial
  • You can insert Testimonial Title(Name), Designation, Content and thumbanail image here
  • Then Publish Your First Testimonial. After it You can add more Testimonial in same style.

Design Team Section

  • Go to Construction Zone Settings
  • Click On Home Page Settings
  • Select Team Option
  • You can insert Team Section Title, Description, Column and group from here.


Add Team

  • After Set Team Properties now Go on Team
  • Click On Add New Team
  • You can insert Team Title(Name), description and Thumbanail image here
  • We also offer 16 social media links. Insert these links with full url including http or https
  • Also You can set Team Member custom link, Mobile Number, Phone etc.
  • Then Publish Your First Team. After it You can add more Team in same style.

Design Client Section

  • Go to Construction Zone Settings
  • Click On Client Option
  • You can select Client/Partner Column Layout from dropdown
  • Select groups of clients which want to show you on Homepage


Add Client

  • After Set Client Properties now Go on Clients/Partners
  • Click On Add New Client
  • You can insert Client Title(Name), Website Link, Thumbnail and group from given fields
  • Then Publish Your First Client. After it You can add more Client in same style.

Design Facts Section

  • Go to Construction Zone Settings
  • Click On Facts Option
  • You can select Facts Column,Group and then Save


Add Facts

  • After Set Facts Properties now Go on Number Facts
  • Click On Add New Facts
  • You can insert Counter Number Icons, Number in given fields and groups
  • Then Publish Your First Facts. After it You can add more Facts in same style.

Design Blog Section

  • Go to Construction Zone Settings
  • Click On Blog Option
  • You can select Blog Section Title, Description,Column and then Save

Design Callout

  • Go to Construction Zone Settings
  • Click On Header Callout Option
  • You can Callout Title, Button Text, Button URL , Background Image and then Save

Design Home Layout Manager

  • Go to Construction Zone Settings
  • Click On Design Home Layout Manager
  • If you want to hide or show any section from the Homepage you can do it from here. Just drag and drop section
  • Enabled section will appear on your homepage and disabled section will not show on homepage

  1. Go to Construction Zone Settings
  2. Click On Theme Design Settings
  3. By using Theme Color settings you can choose color for your theme.
  4. By Using On button You can Use Custom fonts Body content? for apply fonts on entire body content. You can set font family of your theme from here.
  5. Also you can change custom font for menu

  • Go to Construction Zone Settings
  • Click On Header Navigation
  • Select Logo & General Styling
  • You can Select Use Image for Logo? for image Logo.
  • If you want to show site title name then Go dashboard Appearance -> customize -> Site Identity and enter Site Title and Tag Line


Layout Related

  • Go to Construction Zone Settings
  • Click On Header Navigation
  • Layout Related
  • You can on Full Width Header for show in full width
  • Enable Stciky Header - If you want to enable Stciky Header Then you can do it via click ON button.
  • Save settings after do this

Header Menu Presets

  • Go to Construction Zone Settings
  • Click On Header Navigation
  • Select Header Menu Presets
  • Save settings after do this

  1. Go to Construction Zone Settings
  2. Click On Top Header Info
  3. If you want to show Top Header area then click "On" Button from Do you want to use the Header Top Area ?
  4. You can insert Plain Header Text, Phone, Email and opening hours of company
  5. If you leave Plain Header Text, Phone, Email and opening hours of company blank then these will not appear

  1. Go to Construction Zone Settings
  2. Click On Portfolio Page
  3. Select Portfolio Style For Portfolio page- Theme is offering 6 Portfolio page templates. So you can choose from here style-1 to style-6 .
  4. You can choose grid and masonary layout for your portfolio.
  5. Select Portfolio Page Layout - You can select full width ot container look of portfolio page
  6. Enable Space Between Portfolio - If you to enable space between you can select Yes and for not showing space you can cheese No from the dropdown
  7. Select Portfolio Columns- You can select Portfolio columns on Portfolio page Ex- 2 column, 3 column, 4 column
  8. You can set any page as portfolio just edit page and select attribute as Portfolio and update page

  1. Go to Construction Zone Settings
  2. Click On Service Page
  3. Select Service Style For Service page - Theme is offering 6 Service page templates. So you can choose from here style-1 to style-6
  4. Select Services Group - If you want to show only particular group on service page then you can show select from here.
  5. Select Service Columns- You can select service columns on service page Ex- 2 column, 3 column, 4 column
  6. You can set ant page as service page. Just edit page and select attribute as Service Page and update page

  1. Go to Construction Zone Settings
  2. Click On Team Page
  3. Select Team Style For Team page - Theme is offering 3 Team page templates. So you can choose from here style-1 and style-3
  4. Select Service Columns- You can select service columns on service page Ex- 2 column, 3 column, 4 column
  5. You can set any page as Team page. Just edit page and select attribute as Team Page and update page

  1. Go to Construction Zone Settings
  2. Click On Blog Page
  3. Blog Style - Select Default for full width Blog, and 2 column, 3 column Layout
  4. You can also enable Blog Sidebar Option Left, Right and without Sidebar from dropdown
  5. You can choose grid and masonary layout for your blog.
  6. You can select blog content length
  7. Save settings after do this

  1. Go to Construction Zone Settings
  2. Click On Page Header Title
  3. You can on Page Title Header Section for show this on page
  4. You can select Background Type,Background Color,Font Color,Background Image.
  5. You can on breadcrumb for show on page Header Title
  6. Save settings after do this

  1. Go to Construction Zone Settings
  2. Click On Social Media Links
  3. You can insert social media links which will appear on footer

  1. Go to Construction Zone Settings
  2. Click On Footer Option
  3. Footer customization - You can edit copyright text from here.
  4. Footer Column - You can select columns layout for footer widgets
  5. Footer Callout - You want to show footer callout then click On and insert values in given fields like text, button url
  6. Do you want to use the Social Media Links in Footer ? - If you want to show icons in footer area then click and select which icons you want to show in footer via checkbox

  1. Go to Construction Zone Settings
  2. Click On Custom URL Settings
  3. You can set custom URL links from here

  1. Go To any page or Post
  2. Click On wpshopmart shortcode
  3. Select shortcode from the Pop Up wpshopmart Shortcodes settings
  4. Select shortcode which you want to be inserted and fill the properties in given fields.
  5. Then click on Add Shortcode button at bottom