How To Change The Author In WordPress (Methods)
When it comes to posting content and adding value to the lives of your target audience, there is no easier platform than WordPress. Imagine the chance of helping people out with their problems through engaging and interactive posts. One of the advantages that WordPress gives you is its high level of flexibility. For instance, you can edit your name as the author of any post. And in this article, I will tell you How you can change author in WordPress.
Here is how to do it
Talking about changing your name as an author of any post, it has been discovered that most people believe this process is very difficult. If you haven’t done such before, you will feel it is rocket science. This is not true in any way as you can do such within few seconds.
Are you wondering how to change the author name in WordPress? Do you know that this process isn’t complicated as many people are making it sound? This post will be revealing some of the methods that can enable you to change the author name in WordPress. Just follow the steps being explained below and you will be fine.
Why is this crucial?
There are numerous instances when you will have to change the author of a post on your WordPress website. For instance, this becomes necessary when any of the authors in your blog is no longer in your team. Another instance is when a post has been updated. In this case, the writer who has made such revisions possible needs to be given credit. Whatever your reasons are to change the author’s name, the methods revealed below can help you out.
Also if you want to create custom posts in WordPress, check out our article “How to Create Custom Post Types in WordPress in 4 Easy Steps“.
Method 1 – Changing The Post of An Author To That of Another User
There is something most people don’t understand about WordPress. This is the fact that posts are attributed to their creators automatically. The good part is that such author names can be changed using the editor. Follow the details below in order to get this done without hassle.
Step 1
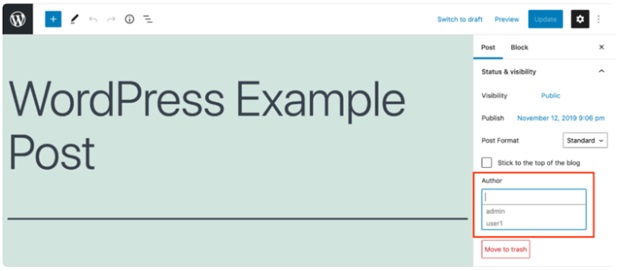
Locate the post editor. This can be found on the right side of your post tab as shown below. Once you click on the section which says “Status & Visibility”, the option to enter the username of the new author will be shown.
Step 2
After you have succeeded in inputting the new author name, ensure to hit the ‘Update” button above at the upper right corner. This will enable your changes to be saved.
Another way you can go about this problem is to head over to your WordPress admin dashboard and click on posts you have created. Now, locate the one you would like to change the author name and hit the “Quick Edit” button below it.

A menu is going to appear. This allows you to choose the user that such post will be attributed to like the picture shown below. This method allows you to change the name based on the roles of the user like contributor, admin, editor, and author.
Method 2 – Adding or changing an author
This method enables users to be added to your website. It involves steps that are quite simple and straightforward. These will be broken down in detail below:
Step 1
Head over to your WordPress admin. This can be done through www.addyourwebsitehere.com/wp-admin. You will be taken to a page that looks like this:
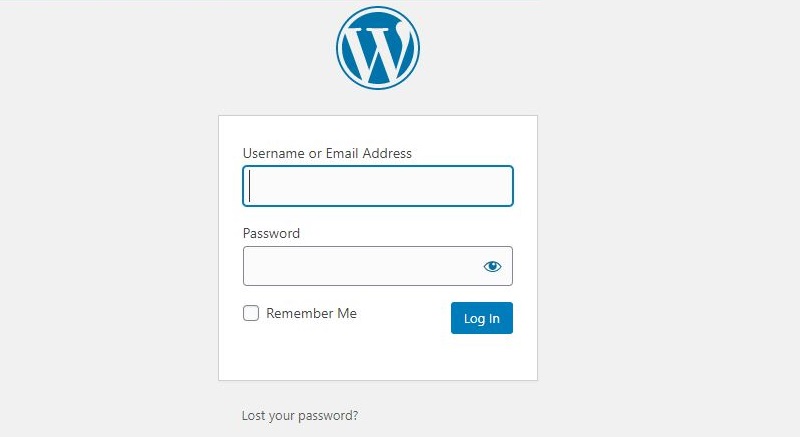
Fill in your username and password. In case you can’t remember your password, click on the link below which says “Lost your password”.
Step 2
Once you get redirected to your dashboard, search for “Users” below the options which say “Plugin”. In a nutshell, click Users —-> Add New Users. It is exactly as shown in the picture below.
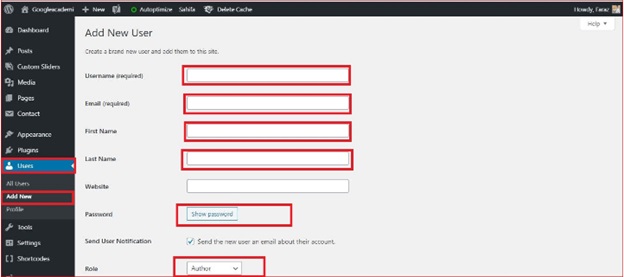
You will need to fill all the fields as required. Once you have filled in the required fields, including the role section, locate the option below which says “Add New User”. With this method, different users can be added as you want. You can even assign specific and unique roles to them. When they make posts, their usernames will appear including the roles they have been assigned. This method is not difficult in any way.
Method 3 – Assigning authors to content that has just been imported
This can be done as the post is being added to your site via WordPress Import Tool. As the post is added, you will have the chance of changing the author name to your preferred choice. This is a very simple and straightforward process that anyone can do.
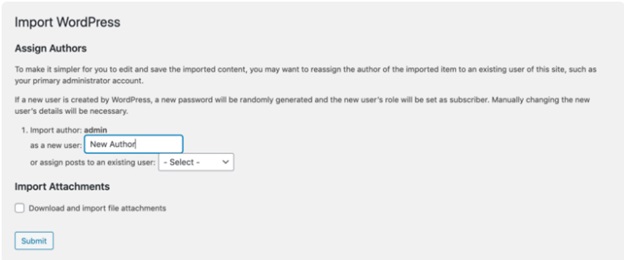
From the picture above, you will notice that there are two options through which this can be done. The first is choosing an author from the list of existing users. The second option is that file attachments can be imported. When the latter option is chosen, a new account will have to be created.

Method 4 – Hiding the name for an author
Sometimes, you may not see the reason to display the names of authors on your site. Of course, you must have read posts on some websites whereby the names of their authors are not mentioned. This becomes necessary when your website is small. In other words, the posts are being created by one author. When attribution is removed, such can enable you to get rid of redundancy.
To remove the name of the author from your posts automatically and easily, install a plugin known as “WP Meta and Date Remover”. Once this tool has been activated, the names of authors will be removed. It should be noted that this can be done manually. All you have to do is remove metadata from the theme of your site. This is only recommended if you understand how codes are being used.
Final words
From the above, you can see that changing the author name of any post on your website isn’t difficult as most people are making it sound. You only need to follow the steps that have been outlined above to carry out such a process without mistakes. The best part is that there are various options you can explore as revealed in this post.
