How To Set Up Your WooCommerce Print Shop On WordPress Website

Hey guys, if you want to know how to set up your WooCommerce Print Shop on WordPress Website then keep reading this article.
There are various ways to set up an online print store but you might be wondering why a guide to building one with WooCommerce? Well, it’s true that it’s easy to set up one with it but a guide will make you build the best one in the right way.
What Is Print Shop And Why You Need One?
The craze for printed products is shooting up and so is the demand for print shops. By print shop, we mean online printing services where all printing needs are met i.e one can get anything from clothing, bags, homeware, mobile covers, and more custom printed, personalized, and ordered using the specialized web to print solutions.
Although there are enough print shops offline, with the current pandemic situation and online shopping becoming the new-normal, online presence is turning into a need of the hour more than just a trend. So, investing in a print shop at present appears to be a smart move and we are here to help you get started with WooCommerce.
Why WooCommerce?

Of course, there is enough WordPress web to print plugins in the market to confuse you but WooCommerce is a stand-out.
WooCommerce, a customizable, open-source eCommerce platform built on WordPress is a powerful and flexible plugin that makes it the most preferred choice for adding a shop to WordPress websites. So let’s get straight to the set up your WooCommerce Print Shop on WordPress Website.
Table of Contents:
1. Install WooCommerce Plugin
2. Go Through Setup Wizard Or Skip For Later
3. Additional Settings
4. How To Create Your First Print Product
5. How To Add Your Print Shop To Your Menu
1. Install WooCommerce Plugin

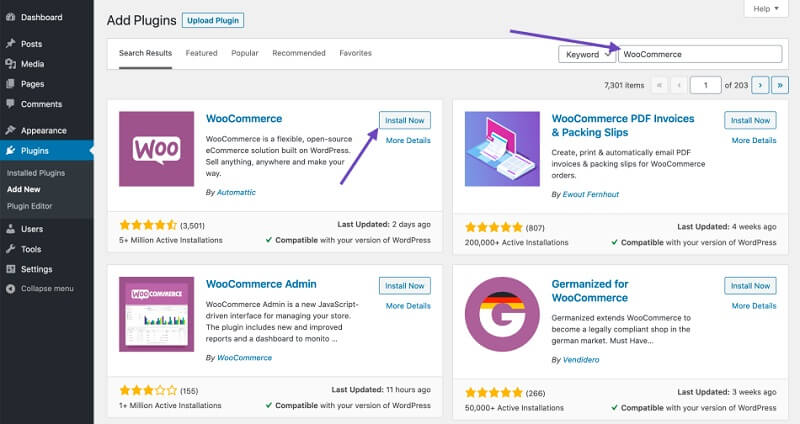
Start by installing the WooCommerce plugin which you can easily get by searching “WooCommerce” in the Plugins option.
2. Go Through Setup Wizard Or Skip For Later
After installing the plugin, a setup wizard will be displayed which you can go through to set up your plugin the very moment or can skip and do it later. You can set up the pages required for your print shop like the cart, the checkout, customer accounts page, etc. Simply by clicking on the continue button to create them unlike in others where you have to make those pages by yourself.
Next in shop setup, you will be asked to fill up some information about your store (even if it’s an online store) like location, currency and click on Continue for further setup.
After that, you will be asked about your shipping & tax setup where you can choose from the two options whether you will be shipping products or charging sales tax? Even if you haven’t decided yet, you can choose anyone and then come back later to change it.
On the next screen, you will be asked to add all the payment options you want to your print shop. Check up on all the suitable payment options or add other additional modes of payments later as well.
That’s it, your store setup is done! You can proceed further to create your first print product or Return to the WordPress Dashboard link at the bottom of the page to do more settings before the final outcome.
3. Additional Settings
WooCommerce gives you much more than you can imagine. Hence, there are some additional settings that one must not miss if you want a print shop that brings profits. Go to the settings tab in your WordPress dashboard and click on WooCommerce. Here you can add a few additional settings like adding more shipping options, including the Terms & Conditions page for your customers, setting up payment accounts, etc.
4. How To Create Your First Print Product
Since there is a pool of products that you can start your print shop with, it’s time for you to list which products you are planning to focus on. Like for example whether it is the t-shirt printing on your mind or business card printing service you are planning to start with or are willing to offer multiple products. Whatever it is, you can list them all by going to Products > Add Product in your WordPress dashboard and feed basic information like product title, description, image, categories, and tags.
Next, go to the General tab and choose your product type. If it’s a service you’re selling and not some physical product or providing a download then you must check the Virtual box but if you’re offering downloads or shipping a physical product to your customers then you must check the Downloadable box.
Upon clicking the Downloadable box some additional fields will be displayed like which files you want to provide for downloading, set a download limit, and decide whether the download link should ever expire or not, etc. Select and proceed to the final step – Product price where you add up your price details and you are done.
Below the General tab, you will see an Inventory tab that allows you to manage the details of your stock if you have one.
Next To It On The Shipping Tab
You can set your product weight, dimensions, and shipping class depending on the type of shipping you are planning to provide for your physical products.
There will be a few more tabs like Linked Products, Attributes, Advanced which you can set up if you want or skip for later as they are not much necessary to finish your first product setup. Recheck everything and if all set then, scroll back and click upon Publish button to launch your first print product shop.
5. How To Add Your Print Shop To Your Menu
The last and the final but the most important setup is to make your print shop discoverable to your customers because only if they find you, it is going to be a hit. Therefore, go to Appearance > Menus and select the menu you want to add your print shop page to and move to the Pages section, check Shop, click Add to Menu, and then save your menu. Vola!!!! Congratulations you are all set to sell.
Ready To Setup?
We hope you find this guide easy peasy to set up your WooCommerce Print Shop on WordPress but still if you are not confident enough or are facing any difficulty in setting up your WooCommerce custom product designer, don’t freak out Design’N’Buy is always happy to help.
Do you have any questions about WooCommerce product designer? Leave a comment and let us know!
