How To Install A WordPress Theme – Beginners Guide.

Themes are always considered a crucial critical element in web industries. They give the looks and feel to your entire website and web stores. Everyone knows that WordPress is the most widely-used CMS across the globe for creating self-hosted websites. So, if you want to attract more visitors to your websites, an alluring theme is a must to install on your WordPress website.
In this article, we will tell you four methods to install a WordPress theme on your website.
★ Install Themes Directly From The WordPress dashboard
Installing themes from the WordPress dashboard is the easiest method to install a WordPress theme. These are the four basic steps that will help you to install the WordPress theme from the dashboard-
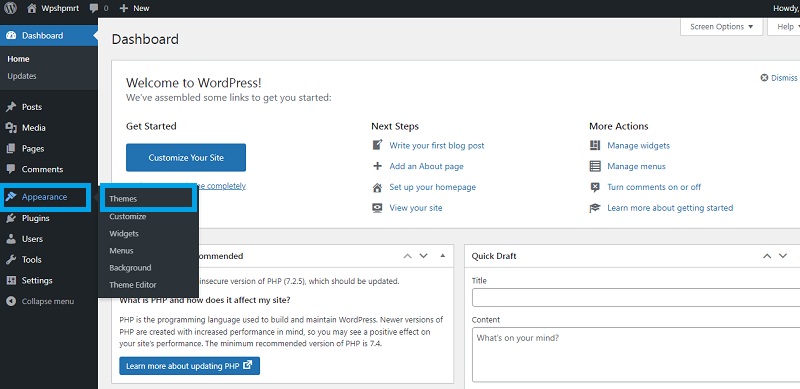
Step 1 – First, You have to log in to your WordPress admin page. Then navigate to Appearance and choose the Themes option.
Step 2 – Now, click on the Add New button to add a new theme.
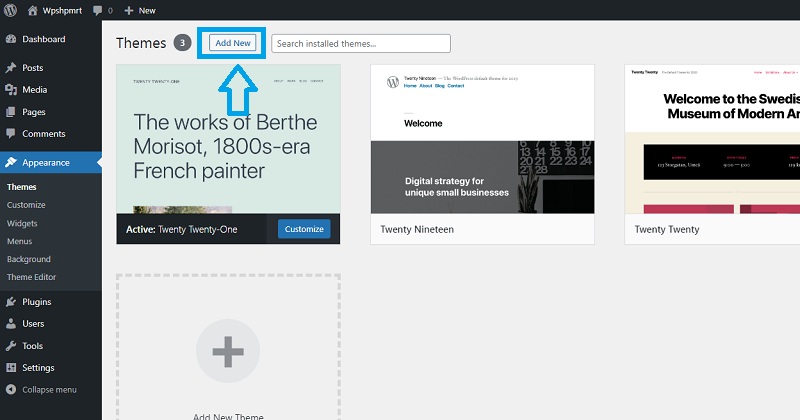
(Note – You have two ways to add a new theme. You can either use the Feature Filter to narrow down your search. Mark the filter fields and click Apply Filter to get the Themes that meet your search criteria. Or You can use the search theme option to find a particular Theme from the WordPress Theme directory.)
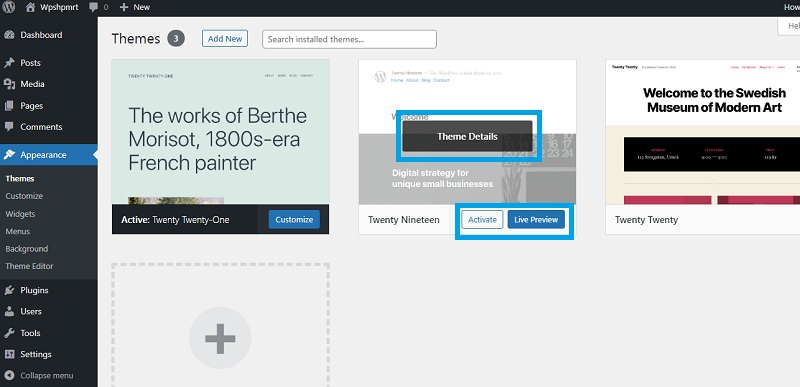
Step 3 – After finding the theme, hover the cursor on it. Now you can see the Details and Preview option. Click on the Details and Preview to get more information about that theme. You can either choose the Preview option to see the demo or the Install option to install it onto your WordPress website.
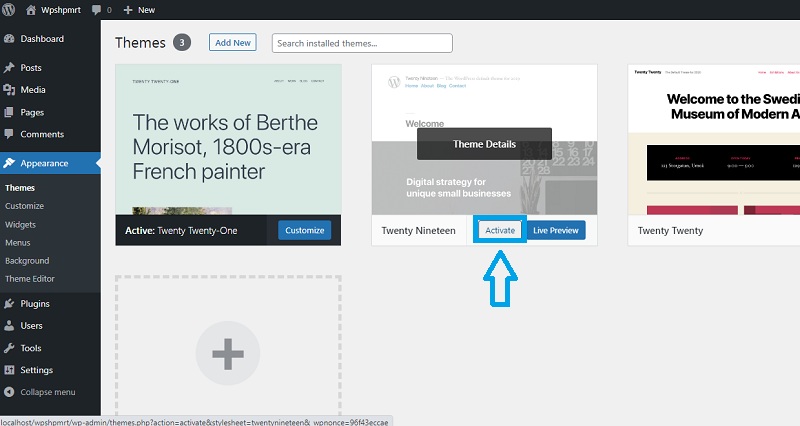
Step 4 – Once You install the theme, the last step is to click the Activate button to activate the theme.
With these four steps, you can easily install the WordPress themes. Now you’re all set, you can preview your site to see how it looks.
★ Upload An Already Downloaded Theme
If you already have a downloaded theme (Paid or free) that is not available in the WordPress.org directory. You can upload this downloaded theme from the WordPress dashboard as well with these four steps-
Step 1 – First, log in to your WordPress admin page. Then navigate to Appearance and choose the Themes option.
Step 2 – Now, click on the Add New button and navigate to the Upload Theme button on the top of the screen.
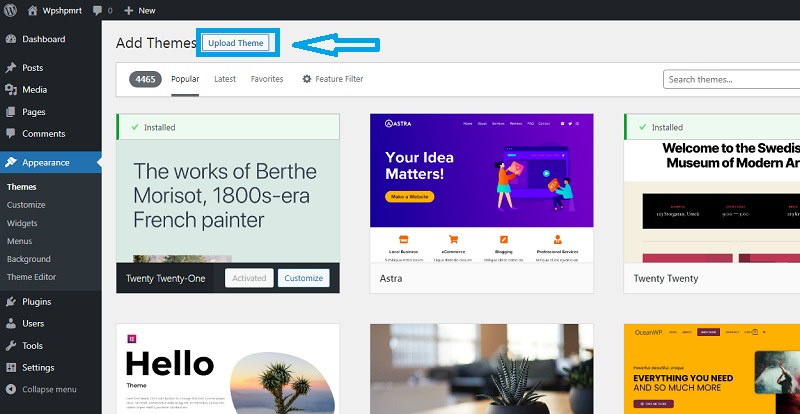
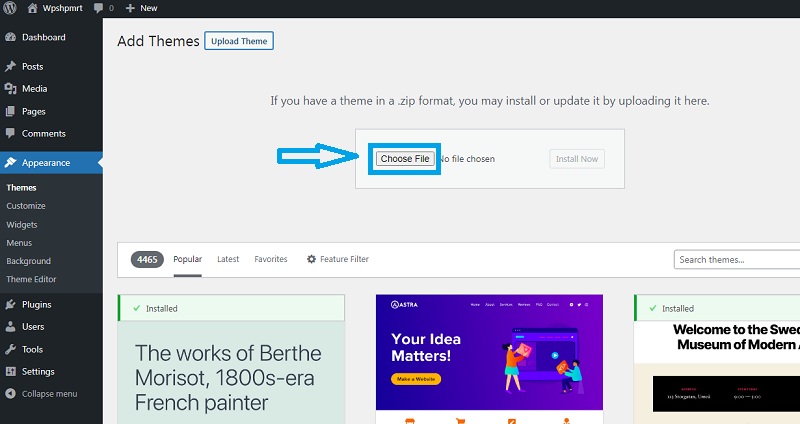
Step 3 – After clicking on the Upload Theme button, a window opens. Now, click on Choose file on that window, select the archive or zip of your theme from your local computer that you want to upload, and press Install Now.
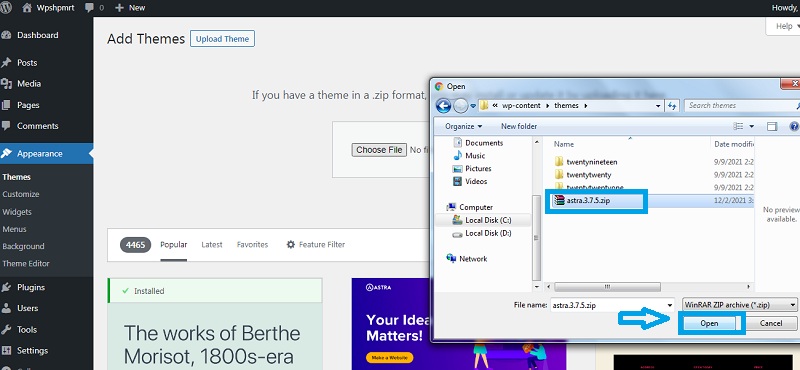
Step 4 – Shortly, WordPress will upload and extract the theme archive or zip. Now you need to press the Activate button to active the theme on your WordPress website.
That is all! Now you can preview your site to see how it looks.
★ Adding New Theme Using cPanel
Another way to install WordPress themes is using cPanel if your host offers the cPanel. You can use CPanel’s Upload option to upload the Theme files to your WordPress website. First, you have to download the Theme archive or zip file to use this method. You can download themes from any of the websites. After downloading the themes, follow these steps to add them to your WordPress-
Step 1 – First, open the cPanel FileManager and navigate to your Themes folder.

(Note – Your theme folder path Depends on your hosting type. To put it simply, you are essentially looking for public_html in which you will get /wp-content/themes/.)
Step 2 – Once you open the Themes folder in cPanel File Manager, You will see the Upload button. Click on the Upload button. Now upload the zip file that you have downloaded before.


Step 3 – After successfully uploading the zip file, right-click on the file in cPanel and select Extract from the context menu to extract the file.

Step 4 – After extracting the file, go to your WordPress dashboard and navigate to Appearance.
Step 5 – Click on the Themes, and You will see all themes from your /wp-content/themes/ directory. Now select your uploaded file. From here, you can either choose the Preview option to see the demo or the Install option to install it onto your WordPress website.
Step 6 – After you install the theme, click on the Activate button to activate the theme.
With this step, you are good to go!
★ Installing New Themes To WordPress Website Using FTP
Another popular method to install new themes to your WordPress website is using an FTP server. To use this method, you will need an FTP client and extracted Theme files. Follow these steps to install your WordPress theme via FTP-
Step 1 – First, download your desired Theme archive or zip file and extract it to a new folder. Note that you must have a folder named the same as the zip name, containing theme files.
Step 2 – Now, open up your FTP client to access your host web server. After opening the FTP client, navigate to /wp-content/themes/ directory.
Step 3 – To upload the Theme folder to this directory on your host server, select the folder containing your saved theme in the Local Site window. Now, right-click on the folder for more options and tap the Upload button.
Step 4 – After uploading the file, go to your WordPress dashboard and navigate to Appearance.
Step 5 – Click on the Themes, and You will see all themes from your /wp-content/themes/ directory. Select your uploaded file. Here, you can either choose the Preview option to see the demo or the Install option to install it onto your WordPress website.
Step 6 – Upon installation, click on the Activate button to activate the theme.
Conclusion:
All of the mentioned methods are good. You can choose any of them, according to your need or preference. With them, you can install both free and paid themes. You can find many free them in the WordPress directory. Or you can also buy premium themes from third-party sites. Many free Themes are ideal and suited for those who have their way with codes, but the paid premium themes offer more support and features for a website tailor-made.
I hope you get all the information that you are seeking. If you have any queries regarding this article, you can ask me in the Comments section below.
